Monthly Archive March 31, 2026

Byjeff

one touch ultra mini user manual

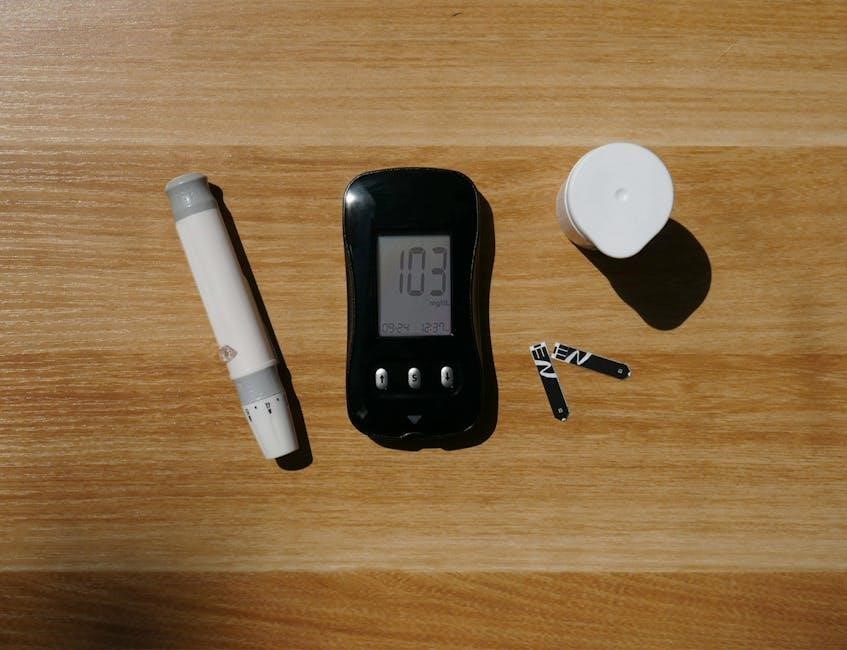
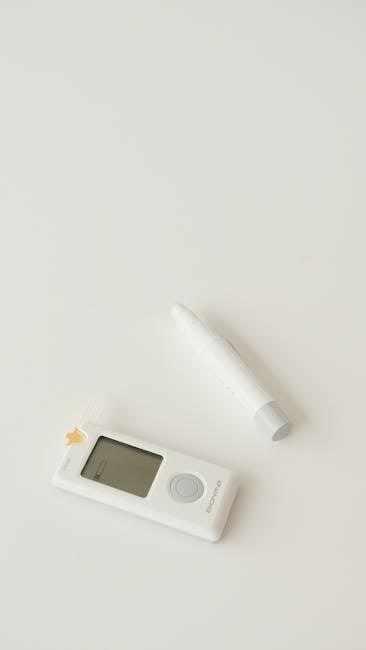
The One Touch Ultra Mini is a compact, user-friendly glucose monitoring system designed for convenient blood sugar testing․

This device facilitates one-to-one communication of health data, offering accurate results for informed diabetes management decisions․

Understanding its features, like memory recall, empowers users to track trends and maintain optimal health, ensuring a focused approach․

What is the One Touch Ultra Mini?

The One Touch Ultra Mini is a compact blood glucose monitoring system meticulously engineered for individuals managing diabetes․ It’s designed to provide quick, accurate, and reliable blood glucose readings, empowering users to proactively manage their health․ This meter facilitates a one-to-one connection with your body’s glucose levels, delivering personalized insights․

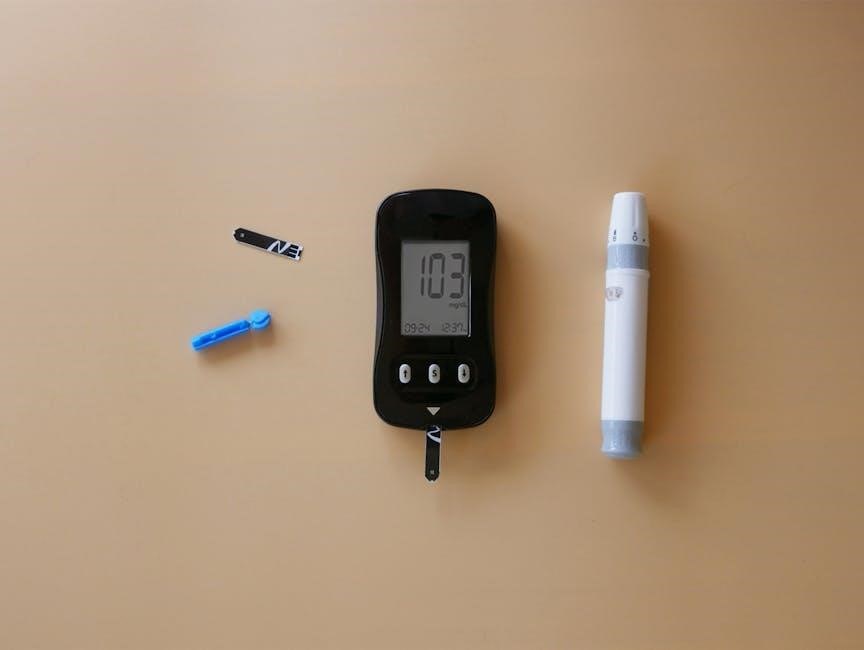
Unlike systems with complex interfaces, the Ultra Mini prioritizes simplicity․ It’s intended for self-testing, meaning individuals can perform tests independently at home or on the go․ The system comprises the meter itself, requiring a test strip for each measurement, and a lancing device to obtain a small blood sample․

The device’s core function revolves around quantifying glucose concentration in a tiny blood droplet, displaying the result on a clear, easy-to-read screen․ It’s a tool for understanding how diet, exercise, and medication impact blood sugar, aiding in informed healthcare decisions․

Key Features and Benefits

The One Touch Ultra Mini boasts several key features enhancing user experience and diabetes management․ Its compact size makes it incredibly portable, fitting easily into a bag or pocket for testing anywhere, anytime․ The meter delivers fast results – typically within seconds – minimizing wait times and streamlining the testing process․

A significant benefit is its simplicity; it’s designed for ease of use, even for those new to self-monitoring․ The system offers memory recall, allowing users to review past readings and identify trends over time․ This data tracking supports informed discussions with healthcare professionals․

Furthermore, the Ultra Mini utilizes minimal blood sample size, reducing discomfort during testing․ Its accuracy, combined with user-friendly features, promotes proactive health management and empowers individuals to take control of their diabetes․

Setting Up Your Meter

Initial setup involves inserting batteries and setting the date and time, crucial for accurate record-keeping and tracking health data effectively․

Inserting the Test Strip

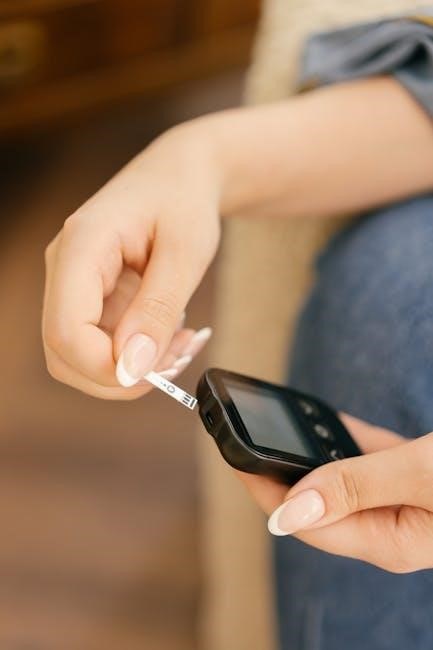
Proper test strip insertion is vital for accurate readings with the One Touch Ultra Mini․ Ensure your hands are clean and dry before handling the strips․ Locate the test strip port, typically on the front or side of the meter․ Gently insert the gray end of the test strip into the port, following the arrow direction indicated on both the strip and the meter․

The meter should automatically recognize the strip, displaying a ready symbol․ If it doesn’t, verify the strip is fully inserted and not damaged․ Do not force the strip; a proper fit is essential․ Using expired or damaged strips will yield inaccurate results, potentially leading to incorrect health management decisions․ Always store test strips in a cool, dry place, and tightly reseal the container after each use to maintain their integrity․

Applying a Blood Sample

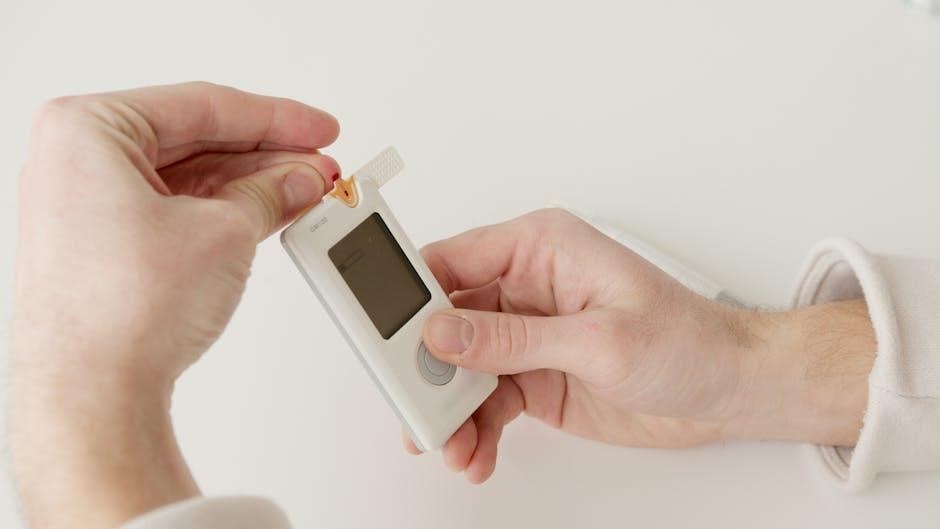
After successful test strip insertion, prepare for blood sample application․ Use a lancing device to gently prick the side of your fingertip – avoid the center for less discomfort․ Wipe away the first drop of blood with a clean, dry cloth․ This ensures an accurate reading by removing potential tissue fluid interference․

Gently touch the edge of the blood sample to the designated sample area on the test strip․ The strip will draw in the required amount of blood automatically; do not smear or apply excessive pressure․ Ensure sufficient blood is applied for a reliable result․ The meter will begin the countdown, displaying the testing progress․ Avoid touching the sample area to prevent contamination and ensure accurate glucose measurement․

Understanding the Meter Display

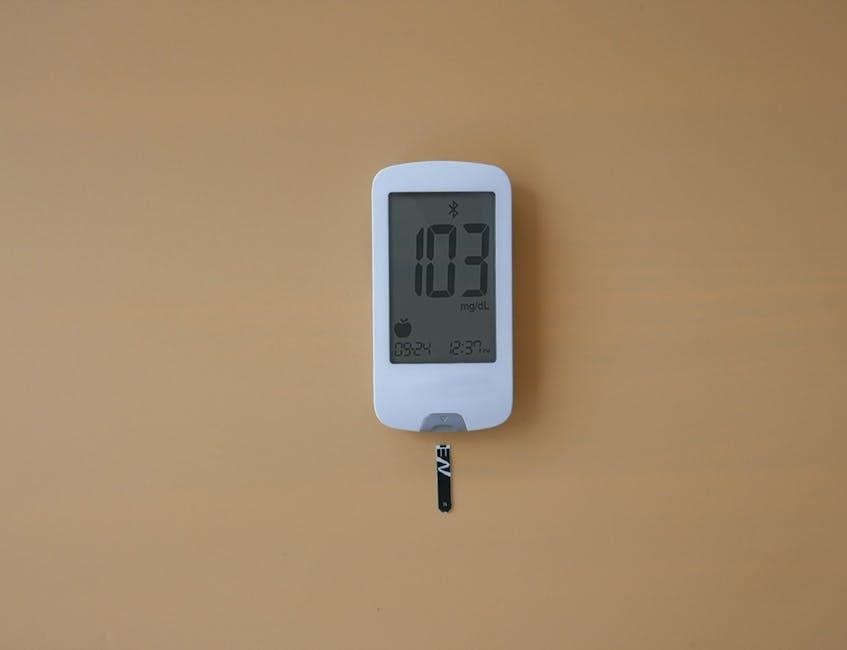
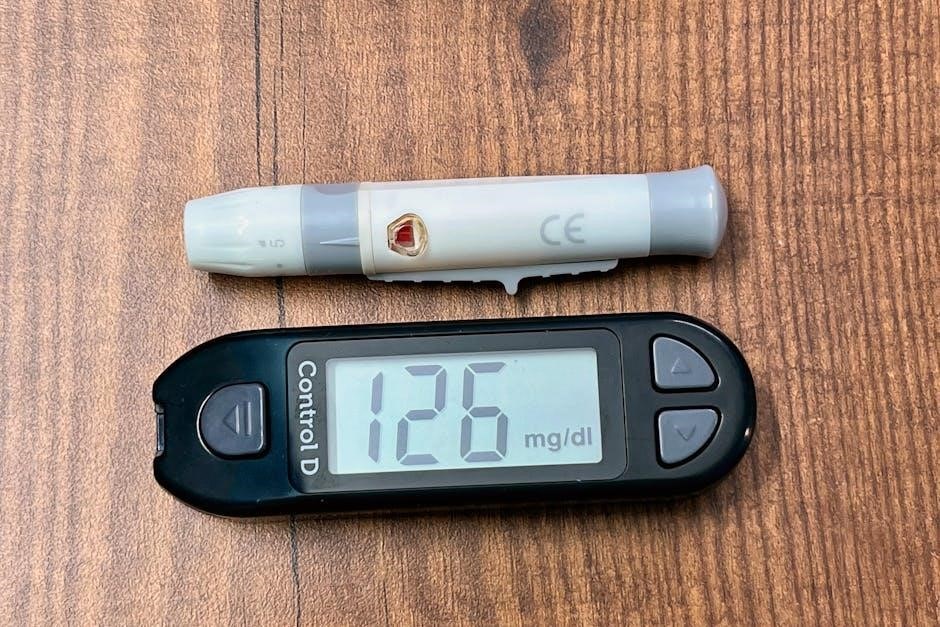
The One Touch Ultra Mini’s display provides crucial information at a glance․ The primary reading shows your current blood glucose level, typically in mg/dL․ A clear indicator confirms when the meter is actively testing, often displaying a countdown timer․ Error codes, if present, will appear alongside a specific symbol, referencing the troubleshooting guide within the user manual․

Battery level is also indicated, alerting you when replacement is needed․ Memory recall symbols show access to previously stored results, enabling trend analysis․ Understanding these elements facilitates informed diabetes management․ The display’s clarity ensures easy interpretation, even for those unfamiliar with glucose monitoring systems, promoting confident self-assessment․

Using the One Touch Ultra Mini

Performing a test involves inserting a strip, applying a blood sample, and reviewing the results․ Accurate readings depend on proper technique and meter maintenance․

Performing a Blood Glucose Test

To begin, ensure your hands are clean and dry․ Insert a test strip into the meter, aligning it correctly with the port – the meter will typically power on automatically․ Using the lancing device, obtain a small blood sample, usually from a fingertip․ Gently touch the edge of the test strip to the blood drop; the strip will draw the sample in․

The meter will then display your blood glucose reading within seconds․ It’s crucial to avoid applying too much or too little blood, as this can affect accuracy․ Remember that results reflect your blood glucose level at that specific moment․ Consistent testing times, such as before meals or at bedtime, provide valuable insights into your glucose patterns․ Always refer to your healthcare provider for interpretation of your results and personalized guidance․

Understanding Your Results

Your One Touch Ultra Mini displays blood glucose levels in milligrams per deciliter (mg/dL)․ Normal ranges generally fall between 70-100 mg/dL before meals and less than 140 mg/dL two hours after eating․ However, individual target ranges may vary based on your healthcare provider’s recommendations․

High readings, consistently above target, may indicate a need for dietary adjustments, increased physical activity, or medication review․ Conversely, low readings, below target, require prompt attention to prevent hypoglycemia․ Tracking results over time, utilizing the meter’s memory recall function, reveals patterns and helps identify factors influencing your glucose levels․ Remember, a one-to-one discussion with your doctor is vital for interpreting results and creating a personalized management plan․

Testing Tips for Accuracy

To ensure reliable results with your One Touch Ultra Mini, proper technique is crucial․ Wash your hands thoroughly with warm water before testing, and ensure they are completely dry․ Use the lancing device as directed, varying the puncture site with each test․ Avoid squeezing the finger excessively when applying the blood sample, as this can dilute the reading․

Confirm sufficient blood is applied to the test strip – not too little, nor overflowing․ Store test strips properly, as humidity and temperature affect accuracy․ Regularly perform control solution testing to verify meter and strip functionality․ Remember, a one-to-one conversation with your healthcare provider is essential for understanding your results and addressing any concerns regarding accuracy․

Meter Functions and Settings

The One Touch Ultra Mini offers features like memory recall, date/time settings, and adjustable parameters for personalized monitoring․

These settings enable a one-to-one tailored experience, enhancing user control and data management for optimal health insights․

Memory Recall – Reviewing Past Results

The One Touch Ultra Mini stores your blood glucose readings, allowing you to track your progress over time․ Accessing this historical data is crucial for understanding trends and making informed decisions about your diabetes management․ To review past results, typically you’ll use the meter’s up and down buttons to scroll through previously recorded values․

The meter displays the date and time each reading was taken, providing context for your results․ Some models may also calculate averages – such as 7, 14, or 30-day averages – offering a broader perspective on your glucose control․ This one-to-one data review empowers you to identify patterns and adjust your lifestyle or medication as needed, in consultation with your healthcare provider․ Regularly reviewing your results is a key component of effective diabetes self-management, ensuring you stay proactive about your health․

Setting the Date and Time

Accurate date and time settings are essential for correctly timestamping your blood glucose readings on the One Touch Ultra Mini․ This ensures accurate tracking and allows for meaningful analysis of your results over time․ Typically, you’ll access the date and time setting through the meter’s menu, often by pressing and holding the ‘Set’ or ‘Menu’ button․

Using the up and down arrow buttons, you can then navigate and adjust the year, month, day, hour, and minute․ Confirm each selection by pressing the ‘Set’ button again․ Proper timekeeping facilitates a one-to-one correlation between your readings and specific events, like meals or exercise․ Incorrect settings can lead to confusion when reviewing your data, so double-check your entries․ Maintaining accurate date and time settings is a simple yet vital step for effective diabetes management․

Adjusting Meter Settings

The One Touch Ultra Mini allows for customization of several settings to personalize your testing experience․ Access these options through the meter’s menu, usually initiated by pressing and holding the ‘Set’ or ‘Menu’ button․ Common adjustable settings include units of measurement (mg/dL or mmol/L), audio volume for beeps, and potentially, target range settings – though personalized target range settings are a more advanced feature․

Navigating with the up and down arrow buttons, select the desired setting and modify it using the same buttons․ Confirm your changes with the ‘Set’ button․ Remember that adjustments impact how your results are displayed and interpreted․ Ensuring settings align with your healthcare provider’s recommendations is crucial․ This one-to-one alignment ensures accurate self-monitoring and informed decision-making regarding your diabetes care plan․

Troubleshooting Common Issues

Error messages require careful attention; a meter not turning on may need new batteries․ Inaccurate readings could stem from improper technique or strip issues․

Error Messages and Their Meanings

The One Touch Ultra Mini displays various error codes to indicate potential problems during testing․ Understanding these messages is crucial for accurate results and proper meter function․ An “E-1” error typically signifies that the test strip hasn’t been inserted correctly, or is damaged; ensure proper insertion and use a fresh strip․

“E-2” often indicates insufficient blood sample – apply a larger drop to the test area․ “E-3” suggests a strip issue, possibly expired or improperly stored; check the expiration date and storage conditions․ If you encounter an “E-4” error, it usually means the meter’s internal components are experiencing a malfunction, potentially requiring service or replacement․

Other codes may relate to temperature extremes or internal system errors․ Refer to the complete list within your user manual for a comprehensive explanation of each code and recommended troubleshooting steps․ Ignoring error messages can lead to unreliable readings and compromised diabetes management․

Meter Not Turning On

If your One Touch Ultra Mini fails to power on, begin by verifying the batteries․ Ensure they are correctly installed, with proper polarity (+ and ⎻ alignment), and haven’t expired․ Replace the batteries with fresh ones, even if the existing ones appear to have some charge remaining․ A weak battery can prevent the meter from functioning correctly․

Next, check for any physical damage to the meter itself, particularly around the battery compartment․ If the issue persists after battery replacement, attempt a reset by removing and reinserting the batteries․ If the display remains blank, there might be an internal component failure․

Contact customer support for assistance, as attempting self-repair could void any warranty․ Do not use the meter if it consistently fails to turn on, as inaccurate readings could result․

Inaccurate Readings

If you suspect inaccurate readings from your One Touch Ultra Mini, several factors could be at play․ First, confirm the test strip hasn’t expired and is stored correctly – cool, dry place, away from direct sunlight․ Ensure your hands are clean and dry before handling the strip and applying the blood sample․

Insufficient blood volume is a common cause of errors; apply a sufficient drop to fully fill the test strip’s sample area․ Also, verify the meter and test strips are compatible; using mismatched components will yield unreliable results․ Regularly perform control solution testing to validate meter accuracy․

If inaccuracies persist, contact customer support; do not base treatment decisions on questionable readings․

Maintaining Your Meter

Regular cleaning with a damp cloth, proper battery replacement, and secure storage are vital for optimal performance and longevity of your One Touch Ultra Mini․

Cleaning and Disinfection

Maintaining hygiene is crucial for accurate results and preventing infection․ After each use, gently wipe the meter with a slightly damp cloth․ Avoid harsh chemicals or abrasive cleaners, as these can damage the device․

Isopropryl alcohol (70%) can be used on the exterior casing for disinfection, but ensure it doesn’t enter the test strip port․ Never immerse the meter in liquid․

Regularly inspect the test strip port for any debris or dried blood․ A cotton swab lightly moistened with water can help remove any obstructions․

Always allow the meter to dry completely before inserting a new test strip․ Proper cleaning extends the life of your One Touch Ultra Mini and ensures reliable performance, contributing to effective diabetes management․

Remember that consistent care is key to accurate readings․

Battery Replacement

The One Touch Ultra Mini typically uses standard AAA batteries․ A low battery indicator will appear on the meter display, signaling the need for replacement․ Do not mix old and new batteries, or different battery types․

To replace the batteries, locate the battery compartment (refer to your meter’s diagram)․ Gently slide off the battery cover and remove the used batteries․

Insert new AAA batteries, ensuring correct polarity (+ and -) as indicated inside the compartment․ Replace the battery cover securely․

After battery replacement, the meter may require resetting the date and time․ Always dispose of used batteries responsibly, following local regulations․ Consistent battery checks ensure uninterrupted glucose monitoring, vital for effective diabetes self-management․

Proper maintenance guarantees reliable operation․

Storage Guidelines

Proper storage is crucial for maintaining the accuracy and longevity of your One Touch Ultra Mini meter and test strips․ Store the meter in a clean, dry place, away from extreme temperatures and direct sunlight․

Test strips should be stored in their original vial, tightly closed, and also protected from heat, moisture, and light․ Avoid storing test strips in bathrooms or other humid environments․

Do not freeze the meter or test strips․ Ideal storage temperature is between 10°C and 30°C (50°F and 86°F)․

Keep the meter and strips out of reach of children․ Following these guidelines ensures reliable performance and accurate readings when you need them, supporting effective diabetes management․ Consistent adherence to these storage recommendations is essential․

Advanced Features

The One Touch Ultra Mini offers data port connectivity for seamless transfer, alongside control solution testing for accuracy verification and personalized settings․

Data Port and Connectivity

The One Touch Ultra Mini may feature data port capabilities, allowing for the transfer of stored blood glucose readings to a computer or other compatible device․ This connectivity facilitates detailed tracking and analysis of your glucose levels over time, aiding in comprehensive diabetes management․

Utilizing specialized software, often available separately, you can download the data from the meter, generating reports and graphs to visualize trends․ This information can be invaluable when discussing your progress with your healthcare provider, enabling more informed treatment decisions․

The specific type of data port – often USB – and the compatible software will be detailed in the full user manual․ Ensure you download the correct software from a trusted source to maintain data security and functionality․ This feature promotes a proactive approach to health monitoring and empowers you to take control of your diabetes care․

Control Solution Testing

Control solution testing is a crucial step in ensuring the accuracy of your One Touch Ultra Mini meter and test strips․ This process verifies that both the meter and strips are functioning correctly and delivering reliable results․ It doesn’t replace regular calibration, but confirms system performance․

You’ll need to purchase control solution specifically designed for your meter․ Follow the instructions in your user manual carefully to apply the control solution to a test strip and insert it into the meter․ The meter will display a result, which you’ll compare to the range printed on the control solution vial․

If the result falls within the specified range, your system is working accurately․ If not, troubleshoot according to the manual or contact customer support․ Regular control solution testing, especially after opening a new vial of test strips, provides peace of mind and confidence in your readings․

Personalized Target Range Settings

The One Touch Ultra Mini allows for personalized target range settings, a valuable feature for tailoring your diabetes management․ Your healthcare provider will determine your ideal blood glucose ranges – before meals, after meals, and at bedtime – based on your individual needs and treatment plan․

While the specific steps may vary slightly depending on the meter version, generally, you’ll access the settings menu through the meter’s buttons․ Navigate to the target range options and input the values recommended by your doctor․ This customization ensures the meter can flag readings outside your personalized goals․

Setting these ranges helps you quickly identify when your blood glucose levels are too high or too low, enabling prompt action and better control․ Remember to consult your healthcare provider for appropriate target ranges․

Safety Information

Precautions and warnings are crucial; use only specified test strips․ Proper disposal of lancets and test strips prevents infection․ Seek medical advice for interpretations․

Precautions and Warnings

Important safety guidelines must be followed when using the One Touch Ultra Mini․ This device is intended for self-testing only and should not replace professional medical care․ Always consult your healthcare provider for diagnosis and treatment of diabetes․

Never share your lancet or test strips with others, as this can pose a risk of bloodborne pathogen transmission․ Ensure proper hygiene by washing your hands thoroughly with soap and water before and after testing․ Do not use the meter if it is damaged or malfunctioning․

Keep the meter and accessories out of reach of children․ Store test strips in a cool, dry place and do not use them past their expiration date․ Be aware of potential interference from certain medications or medical conditions that may affect blood glucose readings․ Always interpret results in conjunction with your healthcare provider’s guidance․

Proper Disposal of Test Strips and Lancets

Safe disposal of used test strips and lancets is crucial to prevent accidental needle sticks and potential biohazard exposure․ Used test strips and lancets should be treated as potentially infectious waste․ Do not discard them in regular household trash․

Utilize a sharps container – a puncture-resistant container specifically designed for medical waste – for safe lancet disposal․ These containers are available at pharmacies and medical supply stores․ Once the sharps container is full, follow your local regulations for proper disposal, often involving designated collection sites․

Dispose of used test strips in a sealed plastic bag before discarding them in the trash․ Always check with your local waste management authorities for specific guidelines regarding medical waste disposal in your area, ensuring responsible environmental practices․

Medical Disclaimer

This One Touch Ultra Mini user manual provides information for operating the device and understanding results, but it is not a substitute for professional medical advice․ Always consult with a qualified healthcare provider for diagnosis, treatment, and management of your diabetes․

Self-monitoring of blood glucose is a tool to aid in diabetes management, but treatment decisions should always be made in consultation with your doctor․ Do not adjust your medication or treatment plan based solely on readings from this meter․

The manufacturer is not responsible for any health consequences resulting from decisions made based on information in this manual․ Individual results may vary, and it’s essential to follow your healthcare provider’s specific instructions․

Byjeff

life as a hunter round 2 answer key pdf

Life as a Hunter Round 2: Answer Key PDF ⏤ Article Plan

Navigating the complexities of the “Life as a Hunter” simulation requires a detailed understanding of energy dynamics.
Finding the Round 2 answer key PDF aids in verifying calculations and strategic decisions made during the activity,
especially concerning kcal intake and expenditure for the lion pride.

Studocu and MrHuestonScience.weebly.com offer resources, though access to a specific, complete answer key PDF
may vary; these platforms provide valuable context for understanding the simulation’s core concepts.

The “Life as a Hunter” activity is an immersive ecological simulation designed to illustrate the intricate relationship between energy consumption and expenditure within a lion pride. This engaging experience, often utilized in biology curricula, challenges students to adopt the role of a pride, strategically planning hunts to meet the daily caloric needs of its members.

Round 2 builds upon the foundational knowledge established in Part 1, demanding a deeper understanding of prey species, hunting costs, and the varying energy requirements of male, female, and juvenile lions. Students analyze scenarios, optimizing hunting strategies to maximize kcal intake while minimizing energy output. Resources like those found on Studocu and MrHuestonScience.weebly.com provide supplementary materials, aiding comprehension of the underlying ecological principles.

Successfully navigating this simulation, and locating resources like a “Life as a Hunter Round 2 Answer Key PDF”, requires careful consideration of the pride’s composition and the energetic value of potential prey – zebra, warthog, and meerkat – ultimately fostering a robust understanding of predator-prey dynamics.

Overview of the Simulation

The “Life as a Hunter” simulation is a model-based learning experience focusing on the energy dynamics of African lions in the Etosha National Park. Students actively manage a simulated lion pride, making decisions about which prey to hunt to satisfy the caloric demands of each member – males, females, and juveniles – with differing needs.

Round 2 expands on the initial exploration, requiring students to apply their understanding of kcal intake versus energy expenditure to optimize hunting strategies. The simulation emphasizes the importance of efficient resource management within a predator population. Accessing supplementary materials, potentially including a “Life as a Hunter Round 2 Answer Key PDF”, can aid in verifying calculations and understanding the rationale behind optimal choices.

Resources like those available on Studocu and MrHuestonScience.weebly.com offer context and support, but the core of the simulation lies in applying ecological principles to a practical, decision-making scenario, ultimately demonstrating the complexities of survival in the wild.

The Goal: Maximizing Kcal Intake for a Lion Pride

The primary objective within the “Life as a Hunter” simulation, particularly in Round 2, centers around maximizing the total kcal intake for the lion pride while minimizing energy expenditure during the hunt. This involves strategically selecting prey – zebra, warthog, or meerkat – based on their respective energy yields and the costs associated with acquiring them.

Success isn’t simply about obtaining the most calories; it’s about efficiency. Students must balance the nutritional needs of each pride member (males, females, and juveniles, each with unique requirements) against the energy invested in the hunt. Utilizing resources, including a potential “Life as a Hunter Round 2 Answer Key PDF”, can help validate strategies.

Understanding the interplay between prey options, energy costs, and individual lion needs is crucial. The simulation challenges students to think like ecologists, optimizing for survival in a resource-limited environment, mirroring real-world predator-prey dynamics.

Understanding Lion Pride Dynamics

Lion prides aren’t homogenous units; they exhibit a complex social structure influencing hunting strategies and energy distribution. Round 2 of “Life as a Hunter” emphasizes this, requiring players to account for the differing needs of males, females, and juveniles within the pride. Females typically undertake the majority of the hunting, a key aspect to remember when optimizing kcal intake.

The simulation highlights that males require significantly more energy (17,500 kcal/day) than females (13,500 kcal/day) or juveniles (11,500 kcal/day). This disparity dictates hunting choices. Accessing resources like a “Life as a Hunter Round 2 Answer Key PDF” can confirm if strategies adequately address these varying demands.

Successfully managing the pride necessitates understanding these dynamics. It’s not enough to simply acquire calories; they must be allocated efficiently to ensure the survival and reproductive success of all members. This ecological realism is central to the simulation’s learning objectives.

Roles within the Pride: Males, Females, and Juveniles

Within a lion pride, distinct roles dictate energy expenditure and intake. Males primarily focus on defending territory, requiring substantial caloric resources – 17,500 kcal daily. Females are the primary hunters, balancing energy output from hunting with their own needs (13,500 kcal) and the demands of nursing or raising cubs.

Juveniles, still developing, have significant energy requirements (11,500 kcal/day) but contribute little to hunting. Understanding these roles is crucial in “Life as a Hunter Round 2.” An answer key PDF can validate if your hunting strategies appropriately support each group’s needs.

The simulation emphasizes that successful pride management isn’t just about total kcal acquired, but how those calories are distributed. A balanced approach, reflected in a correct answer key, demonstrates comprehension of these interconnected roles and their impact on pride survival.

Daily Kcal Requirements

Accurately calculating daily kcal needs is fundamental to success in the “Life as a Hunter” simulation. The pride consists of one male (17,500 kcal), four females (each needing 13,500 kcal), and three juveniles (each requiring 11,500 kcal). This totals 76,000 kcal per day for the entire pride.

A correct “Life as a Hunter Round 2” answer key PDF will confirm if your hunting strategies meet or exceed this total. Failing to account for individual requirements leads to energy deficits and potential pride decline. The simulation isn’t simply about finding food, but optimizing intake relative to these specific needs.

Therefore, verifying your calculations against a reliable answer key is vital; It ensures you’ve correctly applied the provided data and grasped the core concept of balancing energy expenditure with sufficient caloric intake for each lion within the pride.

Male Lion Kcal Needs

The adult male lion within the simulated pride has the highest daily kcal requirement, demanding a substantial 17,500 kcal to maintain energy levels and fulfill his role. This elevated need stems from his larger size and responsibilities in protecting the pride.

A comprehensive “Life as a Hunter Round 2” answer key PDF will detail how hunting choices directly impact the male’s caloric intake. Strategies prioritizing high-yield prey, like zebra, are crucial for meeting this demand. Insufficient intake can negatively affect his ability to defend the territory.

Confirming your calculations against the answer key ensures you’ve accurately factored in the male’s needs when evaluating overall pride success. Understanding this specific requirement is key to optimizing hunting strategies and achieving a thriving, well-nourished lion family.

Female Lion Kcal Needs

Female lions, being the primary hunters of the pride, require a significant daily energy intake of 13,500 kcal. This supports both their hunting activities and, crucially, the energy demands of lactation if cubs are present within the simulated family unit.

The “Life as a Hunter Round 2” answer key PDF will be instrumental in verifying whether your chosen hunting scenarios adequately meet these needs. It allows for a precise assessment of how different prey options contribute to the females’ caloric budget.

Successfully meeting the females’ kcal requirements is paramount, as their hunting success directly dictates the pride’s survival. The answer key provides a benchmark for evaluating the efficiency of your strategies and ensuring the long-term health and productivity of the lionesses.

Juvenile Lion Kcal Needs

Young lions, or juveniles, are in a critical growth phase, demanding a substantial 11,500 kcal per day to support their developing bodies. This energy fuels bone development, muscle growth, and the overall maturation necessary for future hunting prowess.

The “Life as a Hunter Round 2” answer key PDF is vital for confirming that the pride’s hunting strategies provide sufficient energy for these vulnerable members. It allows for a detailed analysis of whether the caloric surplus, after meeting adult needs, is adequate for juvenile development.

Ensuring juveniles receive enough energy is crucial for the pride’s long-term viability. The answer key serves as a validation tool, helping you determine if your hunting choices contribute to a healthy and robust next generation of lions, capable of continuing the cycle of survival.

Prey Species and Energy Dynamics

Understanding the energy trade-off associated with each prey species – Zebra, Warthog, and Meerkat – is central to success in the “Life as a Hunter” simulation. The activity emphasizes maximizing kcal intake while minimizing energy expenditure during the hunt.

The “Life as a Hunter Round 2” answer key PDF provides a benchmark for evaluating the efficiency of different hunting scenarios. It details the kcal gains versus the energy costs for each prey type, allowing for a comparative analysis of their nutritional value.

Analyzing these dynamics is crucial for determining the optimal diet for the lion pride. The answer key helps confirm whether your chosen hunting strategy aligns with the goal of sustaining the pride’s energy requirements, considering the varying needs of males, females, and juveniles.

Available Prey Options: Zebra, Warthog, Meerkat

The “Life as a Hunter” simulation presents three primary prey options for the lion pride: the Zebra, the Warthog, and the Meerkat. Each species offers a different balance between energy gain and expenditure, influencing the overall success of the hunt.

The “Life as a Hunter Round 2” answer key PDF is instrumental in understanding the specific energy dynamics associated with each prey. It details the kcal yield from successfully hunting each animal, alongside the estimated energy cost of the pursuit and takedown.

Effectively utilizing this information, found within the answer key, allows players to strategically select prey that best meets the pride’s daily kcal requirements. Comparing the options is vital for optimizing hunting efforts and ensuring the survival of the lions.

Energy Costs and Gains of Hunting Each Prey

A core component of the “Life as a Hunter” activity revolves around quantifying the energy expenditure versus the energy gained from hunting each prey species. The “Life as a Hunter Round 2” answer key PDF provides crucial data for this analysis.

It details the kcal intake achievable from a Zebra, Warthog, or Meerkat, alongside the estimated energy cost – representing the calories burned during the chase and capture. This information is vital for determining hunting efficiency.

Understanding these values, as outlined in the answer key, allows players to assess which prey offers the most favorable energy return on investment. Strategic decisions hinge on maximizing kcal intake while minimizing energy output, ensuring the pride’s survival.

The PDF clarifies the complex interplay between hunting effort and nutritional reward.

Zebra: Kcal Gains vs. Energy Expenditure

The “Life as a Hunter Round 2” answer key PDF highlights the Zebra as a high-reward, yet energetically demanding, prey option. Hunting a Zebra yields a substantial kcal intake for the lion pride, representing a significant energy gain.

However, successfully taking down a Zebra requires considerable energy expenditure from the hunting females. The PDF details the estimated caloric cost associated with the chase, struggle, and eventual kill, providing a precise figure for energy output.

Analyzing this data reveals the net kcal gain – the difference between the energy obtained from the Zebra and the energy expended during the hunt. This calculation is central to determining if hunting a Zebra is a strategically sound decision for the pride’s overall energy balance.

The answer key provides the specific values needed for this critical assessment.

Warthog: Kcal Gains vs. Energy Expenditure

The “Life as a Hunter Round 2” answer key PDF details the Warthog as a moderate-yield prey choice, offering a balance between kcal gains and energy expenditure for the lion pride. While not as substantial as a Zebra, a Warthog provides a valuable energy source.

However, the hunt isn’t effortless. The PDF outlines the estimated energy cost for females pursuing and subduing a Warthog, factoring in its defensive capabilities and potential for a prolonged chase. This expenditure is crucial for calculating net energy gain.

Comparing the kcal intake from a Warthog to the energy expended during the hunt allows for a strategic assessment. The answer key provides precise figures, enabling students to determine if a Warthog hunt is a more efficient option than pursuing other prey.

Ultimately, the PDF aids in understanding the trade-offs involved in prey selection.

Meerkat: Kcal Gains vs. Energy Expenditure

The “Life as a Hunter Round 2” answer key PDF reveals that Meerkats represent the lowest-yield prey option, presenting a significant challenge for the lion pride seeking to maximize kcal intake. While relatively easy to capture, the energy return is minimal.

The PDF details the low kcal content of a Meerkat, contrasting it sharply with the energy expenditure required for even a brief hunt. This highlights the inefficiency of relying on Meerkats as a primary food source.

Analyzing the data within the answer key demonstrates that the energy expended in locating and capturing Meerkats often outweighs the nutritional benefits gained. This makes Meerkat hunting a less viable strategy for sustaining the pride’s daily requirements.

Therefore, the PDF underscores the importance of prioritizing higher-yield prey to optimize energy balance.

Analyzing Hunting Scenarios

The “Life as a Hunter Round 2” answer key PDF emphasizes a systematic approach to evaluating different hunting scenarios for the lion pride. It stresses the importance of considering both kcal gains and energy expenditure for each prey option.

Students are guided to analyze how varying prey combinations impact the pride’s overall energy balance, with the PDF providing detailed breakdowns of each scenario’s efficiency. This involves comparing the total kcal intake against the collective energy costs of the hunt.

The key PDF highlights the need to account for the differing needs of each lion – males, females, and juveniles – when assessing the viability of a hunting strategy. Optimal scenarios prioritize meeting these diverse requirements.

Ultimately, the analysis aims to identify the most sustainable and efficient hunting plan, maximizing the pride’s chances of survival and thriving within the Etosha ecosystem.

Optimal Hunting Strategies for the Pride

The “Life as a Hunter Round 2” answer key PDF reveals that successful strategies center around maximizing kcal intake while minimizing energy expenditure for the entire lion pride. It underscores the efficiency of focusing on prey that deliver the highest energy return for the effort invested.

Based on the simulation’s data, the PDF suggests prioritizing prey species like the zebra, which offer substantial kcal gains compared to smaller options like meerkats or warthogs. This aligns with the pride’s substantial daily energy demands.

Effective strategies also involve considering the roles within the pride; females, as primary hunters, must efficiently secure enough energy to support themselves, the male, and the developing juveniles.

The answer key PDF emphasizes that a balanced approach, informed by careful analysis of energy dynamics, is crucial for long-term survival and reproductive success within the simulated environment.

The “Optimal Scenario”: Hunting One Zebra

The “Life as a Hunter Round 2” answer key PDF consistently highlights hunting one zebra as the most optimal scenario for the lion pride’s energy needs. This strategy demonstrably provides the highest kcal intake with a reasonable energy expenditure, as detailed in Table 2.

This scenario effectively addresses the combined daily requirements of the one male (17,500 kcal), four females (54,000 kcal), and three juveniles (34,500 kcal), totaling 106,000 kcal. A single zebra provides sufficient energy to meet, and potentially exceed, these demands.

The PDF illustrates that alternative strategies, such as focusing on warthogs or meerkats, require significantly more hunting effort to achieve the same kcal intake, rendering them less efficient.

Therefore, the answer key PDF reinforces that prioritizing zebra hunts represents the most sustainable and energy-efficient approach for the pride’s survival within the simulation’s parameters.

Table 2: Hunting Results as a Pride (Optimal Scenario) ⏤ Detailed Breakdown

The “Life as a Hunter Round 2” answer key PDF features Table 2, showcasing the detailed results of the optimal hunting scenario – focusing on one zebra. This table meticulously breaks down the energy dynamics for the pride.

Notably, the table indicates zero contributions from meerkat and warthog hunts in this optimal setup, emphasizing the zebra’s superior energy yield. The total kcal intake reaches approximately 150,000 kcal, significantly exceeding the pride’s combined daily need of 106,000 kcal.

The PDF highlights that this surplus allows for energy reserves, crucial for periods of unsuccessful hunts or increased activity. The table also implicitly demonstrates the minimized energy expenditure associated with a single, high-yield hunt.

Analyzing the table within the answer key PDF confirms the efficiency of this strategy, solidifying the zebra as the cornerstone of a successful hunting plan for the simulated lion pride.

Key Findings from Part 1 of the Activity

The “Life as a Hunter” Round 1 activity, as detailed in resources like MrHuestonScience.weebly.com, established fundamental principles crucial for success in Round 2. A key finding was the varying kcal requirements based on lion demographics – males needing 17,500 kcal, females 13,500 kcal, and juveniles 11,500 kcal daily.

Furthermore, the simulation demonstrated that not all prey are equal. While multiple options existed (zebra, warthog, meerkat), the zebra emerged as the most efficient energy source for the pride. This efficiency stemmed from its high kcal yield relative to the energy expended during the hunt.

The answer key PDF likely reinforces this, showing how prioritizing the zebra maximized overall kcal intake and minimized energy deficits. Understanding these findings is paramount for optimizing strategies in Round 2, building upon the established energy dynamics.

Recap of Kcal Intake and Energy Output

Part 1 of “Life as a Hunter” centered on balancing the pride’s energy budget. The core challenge involved securing sufficient kcal intake to meet the combined needs of one male, four females, and three juveniles – a total of 79,500 kcal per day. Resources like MrHuestonScience.weebly.com highlight this critical calculation.

The activity emphasized that hunting isn’t simply about acquiring calories; it costs energy. Each prey species presented a different kcal gain versus energy expenditure ratio. The optimal strategy, confirmed by Table 2, involved hunting one zebra, demonstrating the highest net energy benefit.

An answer key PDF would likely detail these calculations, showcasing the precise kcal intake from the zebra and comparing it to the energy costs associated with the hunt. This recap is vital for approaching Round 2 with a clear understanding of energy dynamics.

Applying the Concepts to Round 2

Building upon the foundation of Part 1, Round 2 likely introduces complexities – perhaps fluctuating prey populations, varying hunting success rates, or environmental factors impacting energy expenditure. Understanding the initial kcal requirements (17,500 for males, 13,500 for females, 11,500 for juveniles) remains paramount, as detailed on MrHuestonScience.weebly.com.

The optimal strategy from Round 1 – focusing on zebra – serves as a benchmark. However, a successful approach in Round 2 demands adaptability. An answer key PDF could reveal if the simulation introduces scenarios where zebra are scarce, forcing the pride to reassess and potentially utilize warthog or even meerkat, despite their lower energy returns.

Effectively applying the learned concepts means analyzing each hunting scenario, meticulously calculating net kcal gain, and prioritizing efficiency. The key is to minimize energy output while maximizing the pride’s overall caloric intake for survival.

Where to Find the “Life as a Hunter Round 2 Answer Key PDF”

Locating a dedicated “Life as a Hunter Round 2 Answer Key PDF” proves challenging, as direct access isn’t universally available. Studocu (studocu.com) is a potential resource, though its content is user-generated and may not offer a complete, official key. Searching specifically for “Life as a Hunter Round 2” on the platform is recommended.

MrHuestonScience.weebly.com hosts materials related to the activity, but doesn’t explicitly list a Round 2 answer key PDF. However, the site’s background information and instructions are invaluable for independently verifying calculations and understanding the simulation’s logic.

Alternatively, checking with your instructor or classmates is often the most reliable method. Educational platforms used by your school might also contain supplementary materials, including answer keys. Diligent searching and collaboration are key to success.

Resources and Further Study

Expanding your understanding beyond the “Life as a Hunter” simulation involves exploring broader ecological concepts. Khan Academy’s biology section offers excellent resources on energy flow in ecosystems, predator-prey relationships, and population dynamics – crucial for contextualizing the activity’s principles.

National Geographic provides captivating documentaries and articles detailing lion behavior, hunting strategies, and the challenges they face in the wild. These resources offer real-world insights complementing the simulation’s model.

Further research into the Etosha National Park, the simulation’s setting, can illuminate the specific prey species and environmental factors influencing lion survival. Academic databases like JSTOR and Google Scholar provide access to scientific papers on African wildlife ecology. Remember to critically evaluate sources and focus on peer-reviewed research for reliable information.

Byjeff

auto ranging multimeter vs manual

Digital multimeters (DMMs) come in two primary types: auto-ranging and manual-ranging. Auto-ranging offers convenience, while manual-ranging provides control and precision for experienced users.

What is a Multimeter?

A multimeter is an essential electronic testing tool, capable of measuring multiple electrical characteristics. Primarily, it measures voltage, current, and resistance, but many models also include functions like continuity testing, diode checks, and capacitance measurement. These versatile devices are indispensable for electricians, electronics enthusiasts, and anyone involved in circuit design or repair.

Essentially, a multimeter acts as a central hub for diagnosing electrical issues. It allows users to understand how electricity flows within a circuit, identify potential problems, and verify the functionality of components. Whether troubleshooting a household appliance or working on complex electronic systems, a multimeter provides critical insights into electrical performance. Choosing between auto-ranging and manual models depends on user expertise and application needs.

The Core Difference: Range Selection

The fundamental distinction between auto-ranging and manual-ranging multimeters lies in how the measurement range is determined. Manual-ranging multimeters require the user to select the appropriate range for the expected value – for example, 200mV, 2V, or 200V for voltage measurements. This demands prior knowledge of the circuit and potential readings.

Auto-ranging multimeters, conversely, automatically detect the correct range. They analyze the input signal and adjust accordingly, eliminating the need for manual selection. This feature offers convenience and protects against overload damage from incorrect range choices. While accuracy remains consistent once the range is set (or auto-selected), the speed of stabilization differs between the two types.

Auto-Ranging Multimeters: Convenience and Ease

Auto-ranging multimeters simplify testing with automatic range detection, making them user-friendly for beginners and ideal for quick field measurements and instant identification.

How Auto-Ranging Works

Auto-ranging multimeters eliminate the need for manual selection of the measurement range. Instead of the user choosing settings like 200mV, 2V, or 20V, the multimeter intelligently determines the appropriate range for the input signal.

This is achieved through internal circuitry that continuously monitors the input voltage or current. When the signal exceeds the current range’s capacity, the multimeter automatically switches to a higher range. This process happens seamlessly and rapidly, ensuring accurate readings without user intervention.

Essentially, the auto-ranging function selects the optimal range, mirroring what a skilled user would do manually, but with speed and convenience. The accuracy remains consistent, as it defaults to the same range a manual selection would provide, like 10mA for an 8mA input.

Benefits of Auto-Ranging Multimeters

Auto-ranging multimeters offer significant advantages, particularly for beginners and those needing quick measurements. Their primary benefit is user-friendliness; no range selection is required, simplifying the testing process. This also provides protection against overload damage, as the meter automatically adjusts to prevent exceeding its limits.

They are ideal for field tests and situations where the input signal is unknown or fluctuating. The automatic detection of the correct range saves time and reduces the potential for errors. Visually, they often present a cleaner, more modern appearance compared to manual-ranging models.

While a slight delay exists during range stabilization, the convenience and ease of use generally outweigh this minor drawback.

Drawbacks of Auto-Ranging Multimeters

Despite their convenience, auto-ranging multimeters aren’t without limitations. A key drawback is a slight delay in stabilizing readings as the meter automatically adjusts its range. While often negligible, this can be noticeable when measuring rapidly changing signals.

Although accuracy is comparable when stabilized, some users prefer the direct control offered by manual ranging. The automatic range selection process can sometimes feel less precise, even if the final result is the same.

Furthermore, while generally durable, some argue that auto-ranging mechanisms add complexity, potentially impacting long-term reliability compared to simpler, manual designs.

Auto-Ranging: Speed and Stabilization

Auto-ranging multimeters prioritize user-friendliness, but their speed isn’t always instantaneous. While they quickly identify the correct range for a measurement, a fraction of a second is required for the reading to stabilize after each range change. This stabilization time is a trade-off for the convenience of automatic selection.

The automatic process ensures accurate readings, but it isn’t as immediate as a manually selected, pre-defined range. For static measurements, this delay is often unnoticeable. However, when monitoring fluctuating signals, the slight pause could impact capturing precise peak or transient values.

Ultimately, stabilization is key to accuracy.

Manual-Ranging Multimeters: Control and Precision

Manual-ranging multimeters empower users with direct control over the measurement range, resulting in faster response times and potentially higher precision when used correctly.

How Manual-Ranging Works

Manual-ranging multimeters require the operator to actively select the appropriate measurement range before taking a reading. This is achieved through a rotary dial featuring various scales – for example, 200mV, 2V, 20V, and 200V for voltage measurements.

The user must estimate the expected value of the quantity being measured and choose a range that is higher than that estimate, but not excessively high. If the measured value exceeds the selected range, the multimeter will typically display an overload indication.

Consequently, the user must then increase the range and repeat the measurement. This process demands a basic understanding of the circuit or component being tested and the expected values. Selecting the correct range is crucial for obtaining accurate and meaningful results.

Advantages of Manual-Ranging Multimeters

Manual-ranging multimeters offer distinct advantages, primarily centered around control and precision. They generally provide a faster response time compared to auto-ranging models, as there’s no delay associated with the meter automatically selecting a range. This speed is beneficial in dynamic circuits.

Furthermore, experienced users often appreciate the greater control over the measurement process. Manual selection allows for focused readings and can enhance accuracy when dealing with specific applications.

Importantly, manual meters are typically more affordable and demonstrate increased durability, making them a robust choice for demanding environments. They are often favored by professionals who prioritize control and longevity.

Disadvantages of Manual-Ranging Multimeters

Manual-ranging multimeters, while offering precision, present certain drawbacks. The primary disadvantage is the requirement for the user to possess a good understanding of the circuit being tested to select the appropriate range. Incorrect range selection can lead to inaccurate readings or even damage to the meter from overload.

This manual process is inherently slower than auto-ranging, making them less ideal for quick field tests or situations requiring rapid measurements. The dials, often crowded with numbers, can appear less intuitive to beginners.

Ultimately, the added complexity and potential for user error make manual-ranging meters less user-friendly compared to their auto-ranging counterparts.

Manual-Ranging: Accuracy and Control

Manual-ranging multimeters excel in providing users with a high degree of control over the measurement process. By manually selecting the range, technicians can optimize for accuracy, particularly when dealing with signals of known approximate values. The accuracy remains consistent, as the auto-range would select the same range anyway.

This direct control also translates to faster response times, as the meter doesn’t need to spend a fraction of a second stabilizing after automatically adjusting the range. Experienced users often prefer this responsiveness.

Despite the learning curve, manual ranging offers a level of precision and immediate feedback that auto-ranging sometimes lacks.

Cost Comparison: Auto-Ranging vs. Manual

Generally, manual-ranging multimeters are more affordable than auto-ranging models. However, some UNI-T manual models are currently priced higher than their auto-ranging counterparts.

Typical Price Ranges for Auto-Ranging Models

As of March 15, 2026, auto-ranging digital multimeters exhibit a varied price spectrum, catering to diverse budgets and feature requirements. Entry-level options, such as the UNI-T UT136B, are typically available for around $19.53, making them accessible for beginners and hobbyists. A slightly more advanced model, the UNI-T UT136A, can be found for approximately $18.90, offering similar functionality at a competitive price point.

Stepping up in price, the Vichy VC97 generally retails for around $25.85, while the Vichy VC99, with potentially enhanced features, is priced at approximately $32.98. At the higher end of the auto-ranging spectrum, the YH-113 model commands a price of around $42.64, suggesting a more robust build quality or additional capabilities.

These prices are subject to change based on retailer and promotions.

Typical Price Ranges for Manual-Ranging Models

Determining the price range for manual-ranging multimeters proves challenging as specific models weren’t directly detailed in the provided information. However, the text indicates that UNI-T offers manual-range multimeters, and these are often more expensive than their auto-ranging counterparts. This suggests a potential starting price slightly above the $18.90 ー $19.53 range seen in the UT136 series.

Generally, manual-ranging models, due to their construction and focus on precision, can range from approximately $20 to $60+, depending on brand, features, and build quality. More professional-grade manual multimeters, while not explicitly mentioned, could exceed this upper limit.

The affordability of manual meters is a noted advantage, but the provided data doesn’t offer precise pricing for comparison.

Durability and Build Quality

Manual meters are generally considered more durable than auto-ranging types. This robustness, coupled with simpler internal components, often translates to a longer lifespan.

Auto-Ranging Multimeter Durability

Auto-ranging multimeters, while convenient, often prioritize features over extreme ruggedness. Their internal circuitry, designed for automatic range selection, can be more complex than manual counterparts. This complexity can introduce more potential points of failure, potentially impacting long-term durability.

However, modern auto-ranging models from reputable brands are improving in build quality. Many incorporate protective features like overload protection, safeguarding against damage from incorrect range settings. While not typically as robust as basic manual meters, they are generally sufficient for most hobbyist and professional applications where careful handling is practiced. The “cleaner” and “smarter” aesthetic sometimes comes at the cost of ultimate toughness.

Manual-Ranging Multimeter Durability

Manual-ranging multimeters generally boast superior durability due to their simpler internal design. Fewer components mean fewer potential failure points, contributing to a longer lifespan, especially in demanding environments. Their construction often prioritizes robustness, with sturdy dials and housings designed to withstand regular use and occasional drops.

Historically, manual meters have been favored for their resilience. They often lack the delicate circuitry found in auto-ranging models, making them less susceptible to damage from voltage spikes or rough handling. While modern auto-ranging units are improving, manual meters frequently remain the more affordable and durable option, particularly for those needing a reliable tool in harsh conditions. Their “old-school” design often equates to lasting quality.

Popular Models: A Brief Overview (as of 03/15/2026)

Popular choices include the UNI-T UT136B/A, Vichy VC97/VC99, and the YH-113. UNI-T offers both auto-ranging and manual options, catering to diverse user preferences.

UNI-T UT136B & UT136A

The UNI-T UT136B and UT136A are highly regarded auto-ranging digital multimeters, frequently recommended for their balance of features and affordability. Currently priced around $19.53 and $18.90 respectively (as of March 15, 2026), they represent excellent value for hobbyists and professionals alike.

Both models offer automatic range selection, simplifying measurements and reducing the chance of overload damage. They are user-friendly, making them ideal for beginners or quick field tests. While the UT136B appears to be slightly more feature-rich, the core functionality remains consistent between the two.

Users appreciate their compact size and clear displays. These multimeters are capable of measuring voltage, current, resistance, and continuity, covering a wide range of electrical testing needs. They are a popular choice for those seeking a reliable auto-ranging DMM without the expense of a Fluke instrument.

Vichy VC97 & VC99

The Vichy VC97 and VC99 are auto-ranging multimeters positioned as alternatives within the budget-friendly DMM market. As of March 15, 2026, the VC97 is available for approximately $25.85, while the VC99 is priced around $32.98. These models share the convenience of automatic range selection, simplifying the measurement process for users of all skill levels.

Like the UNI-T options, they offer protection against overload damage due to incorrect range settings. While potentially offering a slightly different feature set or build quality compared to UNI-T, they remain popular choices for those seeking a cost-effective auto-ranging solution.

Users should compare specifications carefully to determine which model best suits their specific needs. Both are capable of performing standard electrical measurements, making them versatile tools for various applications.

YH-113

The YH-113 represents a more premium option within the discussed auto-ranging multimeters, currently priced around $42.64 as of March 15, 2026. Despite its higher cost compared to the UNI-T UT136 series and the Vichy models, it remains significantly more affordable than professional-grade instruments like Fluke. The YH-113 boasts auto-ranging functionality, providing ease of use and protection against overload damage.

Its appeal lies in potentially offering enhanced build quality or additional features justifying the price difference. While specific details require further investigation, it’s positioned as a step up for users seeking a more robust and reliable auto-ranging DMM without exceeding a strict budget.

Consider its specifications carefully to assess if the added cost aligns with your measurement requirements.

Applications: When to Choose Which Type

Auto-ranging multimeters excel in quick field tests and for beginners, while manual-ranging suits those needing precise control and faster response times.

Best Uses for Auto-Ranging Multimeters

Auto-ranging multimeters are exceptionally well-suited for situations demanding speed and simplicity. Their automatic range selection makes them ideal for technicians performing numerous quick checks across diverse circuits. This feature is particularly beneficial for those less familiar with specific voltage or current levels, eliminating the risk of overload damage from incorrect range settings.

They shine in general-purpose troubleshooting, home electrical repairs, and educational settings where ease of use is paramount. The instant range identification streamlines the measurement process, allowing users to focus on the circuit itself rather than manual adjustments. Furthermore, their user-friendly nature makes them a great choice for hobbyists and those new to electronics.

Essentially, if convenience and a broad range of applications are prioritized, an auto-ranging multimeter is an excellent selection.

Best Uses for Manual-Ranging Multimeters

Manual-ranging multimeters excel in scenarios where precision and control are critical. Experienced technicians and engineers often prefer them for detailed circuit analysis and troubleshooting, as the ability to select the specific range allows for finer adjustments and potentially higher accuracy. The faster response time, compared to auto-ranging models, is advantageous when observing rapidly changing signals.

They are particularly useful when working with sensitive circuits or when a known approximate value of the measurement is already available. This pre-selection minimizes settling time and ensures the most accurate reading. Manual-ranging meters are also favored in environments where durability and a classic, robust build are valued, often proving more resilient in demanding conditions.

Ultimately, for those prioritizing control and accuracy, a manual-ranging multimeter remains a powerful tool.

Making the Right Choice

Selecting between auto-ranging and manual-ranging multimeters depends heavily on your needs and experience level. Auto-ranging models, like the UNI-T UT136B or Vichy VC97, are ideal for beginners, quick field tests, and general-purpose use, offering convenience and overload protection. They provide a cleaner, more modern aesthetic.

However, if precision, control, and speed are paramount, a manual-ranging multimeter is the better choice. While they may appear “old-school,” they offer superior accuracy and faster response times. Considering your budget is also crucial; manual models are often more affordable and durable.

Ultimately, both types are valuable tools, and the “right” choice is the one that best aligns with your specific applications and skill set.

Byjeff

alkaline vegan healing guide free pdf

Alkaline Vegan Healing: A Comprehensive Guide

Discover a transformative path to wellness! This guide explores the synergy of alkaline principles and plant-based nutrition, offering a
free PDF resource
for optimal health and vibrant living, based on charts and dietary choices.

Alkaline veganism represents a powerful lifestyle approach, merging the principles of the alkaline diet with the compassionate ethics of veganism. This holistic system centers around consuming foods that promote a more alkaline internal environment, believed to be crucial for optimal health and disease prevention.

Unlike standard diets focusing solely on calorie restriction or macronutrient ratios, alkaline veganism prioritizes the pH balance within the body. A predominantly plant-based diet, rich in fruits, vegetables, and alkaline-forming foods, naturally supports this balance. Many resources, including a free PDF guide, detail how to identify and incorporate these foods into your daily meals.

This isn’t merely a dietary trend; it’s a philosophy rooted in the idea that disease thrives in acidic environments. By neutralizing acidity through food choices, proponents believe the body can heal itself and achieve lasting wellness. The free PDF often includes alkaline food charts and meal planning suggestions to facilitate this transition.

The pH Balance and Your Health

Maintaining a healthy pH balance is fundamental to overall well-being. The body strives for a slightly alkaline state (around 7.36-7.44 in the blood), but modern diets often lean acidic due to processed foods, stress, and environmental toxins. This acidity is believed to contribute to inflammation and various health issues.

An alkaline vegan diet aims to counteract this acidity by flooding the body with alkaline-forming foods. While blood pH is tightly regulated, dietary choices impact the pH of other bodily fluids, influencing cellular function. A free PDF guide on alkaline vegan healing often explains this complex interplay, detailing how food impacts these systems.

Understanding the pH scale and identifying acid-forming versus alkaline-forming foods is key. Resources, like downloadable charts within a free PDF, categorize common foods, empowering you to make informed dietary choices. Prioritizing alkaline foods isn’t about drastically altering blood pH, but about creating an internal environment conducive to optimal health and vitality.

Veganism: A Foundation for Healing

Veganism provides a powerful base for an alkaline lifestyle, naturally eliminating many acid-forming animal products. Meat, dairy, and eggs contribute to acidity in the body, while plant-based foods are predominantly alkaline-forming; This inherent advantage simplifies the process of achieving optimal pH balance.

A free PDF guide on alkaline vegan healing often emphasizes this synergy, highlighting how a plant-based diet reduces the burden on the digestive system and minimizes inflammatory responses. Removing animal proteins also eliminates potential toxins and hormones often found within them.

Furthermore, vegan diets are rich in essential nutrients, antioxidants, and fiber – all crucial for cellular repair and overall health. Many free PDF resources detail meal planning and recipes, making the transition to a vegan lifestyle accessible and sustainable. Embracing veganism is a proactive step towards a more alkaline and healing state.

Understanding the Alkaline Diet

The alkaline diet centers on the pH level of foods and their impact on the body’s internal environment. While blood pH is tightly regulated, diet influences the acidity or alkalinity of tissues. Proponents believe that reducing acidity can prevent disease and enhance well-being.

A free PDF guide to alkaline vegan healing will typically explain the pH scale and categorize foods as acid-forming, neutral, or alkaline-forming. Foods like lemons, despite their acidic taste, are alkaline-forming once metabolized. Conversely, processed foods, sugar, and meat are generally acid-forming.

These guides often include charts detailing the pH levels of common foods, aiding in informed dietary choices. Understanding this principle is key to crafting meals that support a more alkaline state, promoting optimal health and vitality. PDF resources emphasize balance, not strict elimination.

Acid-Forming vs. Alkaline-Forming Foods

A comprehensive alkaline vegan healing guide PDF meticulously details the distinction between acid and alkaline-forming foods. Acid-forming foods, like dairy, processed meats, and refined sugars, leave acidic residue in the body, potentially disrupting pH balance. Conversely, alkaline-forming foods, abundant in plant-based diets, contribute to a more balanced internal environment.

PDF charts often categorize foods based on their Potential Renal Acid Load (PRAL) value. Negative PRAL values indicate alkaline-forming foods, while positive values signify acid-forming ones.

Understanding this categorization is crucial for crafting alkaline vegan meals. Free guides emphasize prioritizing alkaline choices – leafy greens, most fruits, and certain vegetables – while moderating or eliminating acid-forming options to support optimal health and reduce inflammation.

Key Alkaline Vegan Foods

A free alkaline vegan healing guide PDF highlights several food groups as cornerstones of this lifestyle. Leafy greens – spinach, kale, and collard greens – are powerfully alkaline and nutrient-rich. Cruciferous vegetables, like broccoli and cauliflower, offer similar benefits, though some may require gentle preparation for optimal digestion.

Alkaline fruits, including lemons, limes, and avocados, surprisingly contribute to alkalinity despite their acidic taste. PDF resources often detail the PRAL values of these foods, aiding informed choices.

Other key foods include almonds, cucumber, and herbs like parsley and cilantro. Guides emphasize incorporating a diverse range of these foods to maximize nutritional intake and support the body’s natural healing processes.

Leafy Green Vegetables

A free alkaline vegan healing guide PDF consistently champions leafy greens as foundational. Spinach, kale, collard greens, and romaine lettuce are exceptionally alkaline, providing vital nutrients while minimizing acidity in the body. These vegetables are rich in chlorophyll, aiding detoxification and promoting cellular health.

PDF resources often detail preparation methods to maximize alkalinity; lightly steaming or enjoying them raw preserves nutrient content. Incorporating a variety ensures a broad spectrum of vitamins and minerals.

These greens support optimal pH balance, crucial for reducing inflammation and boosting immunity. Guides recommend daily consumption, emphasizing their role in overall well-being and disease prevention.

Cruciferous Vegetables

A free alkaline vegan healing guide PDF highlights cruciferous vegetables – broccoli, cauliflower, cabbage, and Brussels sprouts – as potent alkaline contributors. While slightly acid-forming initially, their metabolic effect is strongly alkalizing, supporting detoxification pathways within the body.

PDF resources often emphasize the importance of proper preparation. Light steaming or gentle cooking methods are recommended to enhance digestibility and maximize nutrient absorption. These vegetables contain glucosinolates, compounds linked to cancer prevention.

Guides suggest incorporating a variety of cruciferous vegetables into your diet to benefit from their diverse nutritional profiles. They are rich in fiber, vitamins, and minerals, promoting gut health and overall vitality.

Alkaline Fruits

A free alkaline vegan healing guide PDF champions fruits as essential components of an alkalizing diet. While all fruits offer benefits, certain varieties are particularly prized for their high alkaline content. Lemons and limes, surprisingly, are top choices despite their acidity, due to their alkalizing effect after digestion.

PDF resources often detail how fruits like avocados, melons (watermelon, cantaloupe), and berries (strawberries, blueberries) contribute to a balanced pH. These fruits are packed with vitamins, minerals, and antioxidants, supporting cellular health.

Guides recommend enjoying fruits in moderation, as their natural sugars should be considered. Prioritizing whole fruits over juices maximizes fiber intake and minimizes sugar spikes, enhancing the overall alkalizing benefits.

Foods to Limit or Avoid on an Alkaline Vegan Diet

A free alkaline vegan healing guide PDF emphasizes minimizing acid-forming foods to maintain optimal pH balance. Highly processed foods, refined sugars, and artificial sweeteners are significant contributors to acidity and should be drastically reduced or eliminated.

PDF resources commonly advise limiting or avoiding grains (especially wheat), dairy (naturally excluded on a vegan diet), and most legumes (some are moderately alkaline). Excessive consumption of nuts and seeds, while healthy, can also lean towards acid-forming.

Guides often highlight the importance of mindful consumption of coffee, alcohol, and soda, as these are strongly acidic. Prioritizing whole, plant-based foods and understanding food charts within the PDF is key to successful alkaline veganism.

Benefits of an Alkaline Vegan Lifestyle

A free alkaline vegan healing guide PDF details numerous health advantages. By reducing acidity, this lifestyle promotes improved digestion, allowing the body to absorb nutrients more efficiently and reducing bloating. Many PDF resources highlight increased energy levels as a common benefit, stemming from optimized cellular function.

Guides emphasize reduced inflammation, a core benefit linked to chronic disease prevention. The abundance of antioxidants in plant-based foods combats free radicals, protecting cells from damage. A balanced pH can also support a healthier immune system, as detailed in many PDFs.

Furthermore, adopting this lifestyle may contribute to weight management and improved skin health, as outlined in comprehensive PDF resources available online.

Improved Digestion

A free alkaline vegan healing guide PDF consistently emphasizes digestive health improvements. Plant-based diets, rich in fiber, promote regular bowel movements and prevent constipation, a common issue addressed in these PDF resources. Alkaline foods are easier for the body to break down, reducing strain on the digestive system.

Many PDF guides detail how reducing acidic foods minimizes digestive discomfort like bloating and heartburn. The focus on whole, unprocessed foods supports a healthy gut microbiome, crucial for optimal digestion and nutrient absorption.

These PDFs often include tips for combining foods to enhance digestibility and suggest incorporating digestive enzymes. Ultimately, an alkaline vegan approach fosters a balanced and efficient digestive system, as highlighted in numerous downloadable guides.

Increased Energy Levels

A free alkaline vegan healing guide PDF frequently links dietary choices to sustained energy. By eliminating processed foods and focusing on nutrient-dense, alkaline-forming plant foods, the body receives optimal fuel. These PDF resources explain how reducing acidity lessens the energy expenditure required for neutralization.

Many guides detail how alkaline diets support adrenal health, vital for energy production. The abundance of vitamins, minerals, and antioxidants in plant-based foods combats fatigue and enhances cellular function, as outlined in downloadable PDFs.

These PDFs often emphasize the importance of hydration for energy levels and suggest incorporating energy-boosting foods like leafy greens and fruits. An alkaline vegan lifestyle, as presented in these guides, promotes consistent, natural energy throughout the day.

Reduced Inflammation

Free alkaline vegan healing guide PDFs consistently highlight the anti-inflammatory power of this lifestyle. Plant-based diets, rich in antioxidants and phytonutrients, combat oxidative stress – a primary driver of inflammation. These guides detail how eliminating common inflammatory triggers like meat, dairy, and processed foods is crucial.

PDF resources often explain the pH connection; an alkaline environment reduces inflammatory responses within the body. Specific foods, like leafy greens and berries, are emphasized for their potent anti-inflammatory properties, detailed within these downloadable guides.

Many PDFs also address the role of gut health in inflammation, advocating for fiber-rich vegan diets to promote a healthy microbiome. By following the principles outlined in a free PDF, individuals can experience significant reductions in chronic inflammation and related symptoms.

Creating an Alkaline Vegan Meal Plan

Free alkaline vegan healing guide PDFs provide structured meal plans to simplify the transition. These resources typically emphasize building meals around 80% alkaline-forming foods and 20% neutral. PDF guides often include sample meal ideas for breakfast, lunch, and dinner, focusing on leafy greens, non-starchy vegetables, and alkaline fruits.

Many PDFs offer shopping lists tailored to an alkaline vegan diet, streamlining grocery trips. They also detail portion sizes and suggest meal prepping strategies for busy schedules. These guides frequently include recipes, making it easier to incorporate alkaline vegan principles into daily life.

A good free PDF will also address mindful eating and hydration, crucial components of an effective meal plan. It will guide you to balance macronutrients and ensure adequate nutrient intake while adhering to alkaline principles.

Hydration and Alkaline Water

Free alkaline vegan healing guide PDFs consistently highlight the importance of hydration, recommending at least eight glasses of water daily. Many emphasize the benefits of alkaline water, with a pH level above 7, to further support the body’s natural pH balance. Some PDFs detail methods for creating alkaline water at home, like using lemon or baking soda.

These guides explain how adequate hydration aids digestion, nutrient absorption, and detoxification – all vital for alkaline vegan healing. They often caution against sugary drinks and excessive caffeine, which can be acidic and dehydrating.

A comprehensive free PDF will also discuss electrolyte balance, suggesting natural sources like coconut water or adding a pinch of sea salt to water. Proper hydration, coupled with alkaline water, is presented as a cornerstone of the lifestyle.

Supplements for Alkaline Vegan Support

Free alkaline vegan healing guide PDFs often address potential nutrient deficiencies common in plant-based diets, recommending strategic supplementation. Vitamin B12 is almost universally suggested, as it’s not reliably found in vegan food sources. Vitamin D, particularly in regions with limited sunlight, is also frequently highlighted.

Many PDFs advocate for omega-3 fatty acids from algal oil, and some suggest iron supplementation, especially for women. Certain guides mention chlorella or spirulina for their alkalizing properties and nutrient density.

However, these free resources emphasize that supplements should complement a whole-food diet, not replace it. They often advise consulting a healthcare professional before starting any new supplement regimen to ensure safety and efficacy.

Potential Challenges and How to Overcome Them

Free alkaline vegan healing guide PDFs acknowledge potential hurdles. Initial digestive discomfort, like bloating or gas, is common as the body adjusts to increased fiber intake. Gradual dietary changes and adequate hydration can mitigate this.

Social situations can be challenging; planning ahead and bringing alkaline vegan options is advised. Nutrient deficiencies, despite careful planning, may occur, necessitating supplementation (as detailed in many PDFs).

Some guides address the psychological aspect – resisting cravings for acidic foods. Mindfulness techniques and focusing on the benefits of the lifestyle are suggested. PDF resources often emphasize patience and self-compassion, recognizing that transitioning takes time and effort;

Finding a Free Alkaline Vegan Healing PDF Guide

Locating a free alkaline vegan healing PDF guide requires careful searching. Numerous websites offer downloadable resources, but quality varies significantly. Look for guides authored by qualified nutritionists or healthcare professionals.

Reputable sources often include detailed food charts (like those referencing alkaline/acid food lists), meal plans, and recipes. Beware of sites promoting overly restrictive diets or unsubstantiated claims. A good PDF will emphasize balance and whole foods.

Online forums and communities dedicated to alkaline veganism frequently share free PDF recommendations. Utilize search terms like “alkaline vegan diet guide PDF” or “alkaline food chart PDF” to refine your search. Always scan downloaded files for viruses before opening.

Resources for Further Learning

Expanding your knowledge beyond a basic alkaline vegan healing guide PDF is crucial for long-term success. Explore websites dedicated to plant-based nutrition and pH balance, seeking evidence-based information.

Consider online courses or workshops led by certified health coaches specializing in alkaline diets. Books authored by nutrition experts offer in-depth insights into the science behind alkaline living.

Academic databases and research articles can provide a deeper understanding of the physiological effects of dietary pH. Don’t forget to explore online communities and forums where you can connect with others on a similar journey, sharing experiences and free PDF resources.

Recipes for Alkaline Vegan Healing

Embark on a culinary journey to nourish your body with delicious, alkaline-forming vegan meals! While a free alkaline vegan healing guide PDF provides foundational knowledge, practical application is key.

Explore recipes featuring abundant leafy greens, cruciferous vegetables, and alkaline fruits. Simple smoothies with spinach, lemon, and plant-based protein are a great start. Experiment with vibrant salads, utilizing avocado, cucumber, and sprouts.

Discover alkaline-friendly soups and stews, incorporating lentils and other alkaline-forming legumes. Many online resources offer free PDF recipe collections tailored to this lifestyle. Remember to prioritize fresh, whole ingredients and mindful preparation for optimal healing.

Embracing Alkaline Vegan Healing

Alkaline veganism offers a powerful pathway to revitalize your health and well-being. By harmonizing the principles of alkalinity with the nourishing power of plant-based foods, you unlock your body’s innate healing capabilities.

Remember, consistency is crucial. Utilize resources like a free alkaline vegan healing guide PDF to deepen your understanding and stay motivated. Embrace mindful eating, prioritize hydration, and listen to your body’s unique needs.

This lifestyle isn’t about restriction, but about abundance – flooding your system with vital nutrients. It’s a journey of self-discovery, empowering you to take control of your health and thrive. Begin today, and experience the transformative benefits!

Byjeff

the extra academy survival guide chapter 1

The Extra Academy Survival Guide: Chapter 1 ౼ An Overview

Welcome! This guide, dated today, 03/05/2026, navigates the complexities of the Academy, drawing from diverse sources – novels (Chapters 9-395!), linguistic definitions (“extra” meaning additional), and even modding communities.

Understanding the “Extra” Concept

The term “extra,” as applied to this Academy, transcends simple addition. It’s not merely additional help, as a basic definition suggests, but signifies a heightened level of expectation and challenge. Consider the “Extra Landscaping Tools” mod for Cities: Skylines – it allows for freedom beyond standard parameters. Similarly, this Academy demands performance exceeding conventional norms.

The “extra” element manifests in hidden curriculum, advanced tactics, and opportunities for advancement. It’s about going beyond the syllabus, recognizing subtle cues, and exploiting advantages. This isn’t about superficial embellishment; it’s about a fundamental shift in approach.

Understanding this core concept is crucial. The Academy isn’t seeking merely competent students, but individuals capable of exceptional achievement. The “extra” isn’t a bonus; it’s the baseline for success, demanding a proactive and resourceful mindset. It’s a quality woven into the very fabric of the institution.

Defining “Extra” in Context

Within the Academy’s walls, “extra” isn’t simply “additional,” as a straightforward translation suggests. It’s a qualitative distinction, akin to choosing “High” graphics settings over “Medium” – a significant leap in demand and reward. Think of it as exceeding the LARGE or EXTRA LARGE sizing for apparel; it requires adapting to a new scale.

This context demands more than just effort; it requires strategic application of resources – time, energy, and intellect. The Academy’s system, like a complex mod, necessitates understanding its underlying mechanics. It’s about recognizing the difference between simply completing assignments and truly mastering the material.

“Extra” implies a commitment to decoding the hidden curriculum and proactively seeking opportunities. It’s a mindset shift, moving beyond passive learning to active engagement. This definition is vital for navigating the Academy’s unique challenges and achieving lasting success.

The Academy Setting: Initial Impressions

Stepping into the Academy is akin to entering a vast, complex system – much like the Cities: Skylines modding community. Initial impressions can be overwhelming, a blend of academic rigor and intricate social dynamics. Expect a landscape demanding adaptation, mirroring the need to adjust to LARGE or EXTRA LARGE sizing.

The sheer volume of information, hinted at by the 71 novels represented by chapters ranging from 9 to 395, is significant. This isn’t a place for passive observation. Active participation, similar to utilizing advanced graphical settings, is crucial. Be prepared for a steep learning curve and a constant need to refine your approach.

Early days will involve assessing faculty, identifying potential allies, and understanding the unspoken rules. Remember, success here requires more than just intelligence; it demands strategic awareness and a proactive mindset.

Chapter 1: Core Challenges

The initial phase presents multifaceted challenges. Beyond the academic demands – comparable to navigating the complexities of a scientific dissertation or a lengthy textbook (108-290 pages!) – lies the intricate web of social hierarchies. Expect a period of adjustment, akin to understanding the nuances between “additional” and “extra” in English vocabulary.

Resource management, encompassing both time and energy, is paramount. The Academy demands a commitment exceeding standard expectations. Prioritization is key, much like selecting optimal graphical settings (Medium, High, or Extra) to balance quality and performance.

Furthermore, deciphering the “hidden curriculum” – the unspoken expectations and power dynamics – will be crucial. This requires astute observation and a willingness to learn from both successes and failures, mirroring the iterative process of mod development and refinement.

Navigating the Academy System

Success hinges on adaptation! Mastering academic expectations, social dynamics, and resource allocation – time, energy – are vital, like optimizing settings for peak performance.

Academic Expectations & Grading

Prepare for rigorous standards. The Academy demands consistent effort, extending beyond merely attending lectures. Expect a curriculum mirroring advanced studies – akin to navigating chapters within extensive novels, potentially reaching chapter 395! Grading isn’t simply about rote memorization; it assesses critical thinking and application of knowledge.

Understanding the “hidden curriculum” is paramount. Faculty, like those listed – Averin VI, Alipov NN, Belousov VV – may have unspoken expectations. Resources, such as libraries and labs, are crucial, but efficient utilization is key. Don’t hesitate to seek tutoring or mentorship; it’s an “extra” advantage.

Exam preparation requires dedicated study techniques. Consider the “High” setting for quality – aim for excellence, but balance it with resource management. Remember, even “extra” help can be beneficial, mirroring the “extra” tools available in modding communities like Cities: Skylines.

Social Dynamics & Cliques

Navigating the social landscape is crucial. The Academy, like any complex institution, fosters distinct social groups – cliques. Understanding these dynamics is vital for survival. Building alliances and friendships offers support, but proceed with caution. Not all connections are beneficial; avoid negative influences and potential conflicts.

Academy politics exist, often subtly. Observing interactions and understanding power structures is key. Consider it a complex novel with numerous characters and interwoven storylines. Be mindful of who you align with, as reputations matter. Remember the importance of maintaining personal well-being amidst these pressures.

Just as “extra” landscaping tools enhance a city, strategic social maneuvering can enhance your Academy experience. However, prioritize genuine connections over superficial alliances. Like the varying sizes (L, XL) fitting different individuals, find your niche and build relationships that support your goals.

Resource Management: Time & Energy

The Academy demands efficient resource allocation. Time and energy are your most valuable assets. Treat them as such. Just as optimizing graphics settings (“Extra” vs. “High”) balances quality and performance, you must balance academic pursuits with personal needs.

Effective planning is paramount. Prioritize tasks, schedule study sessions, and allocate time for rest and recreation. Avoid burnout by recognizing your limits. Remember the extensive documentation – from novels spanning 395 chapters to detailed academic papers (108 pages, 6MB) – requires sustained effort.

Like a complex mod (Extra Landscaping Tools 1.15.0-f2 FIX) requiring system resources, your academic workload will strain your capacity. Learn to say “no” to commitments that overextend you. Strategic resource management isn’t just about doing more; it’s about doing what matters most.

Identifying Key Faculty Members

Navigating the Academy requires understanding its power structure. Identifying key faculty isn’t about favoritism, but strategic awareness. Think of it like recognizing experts within a complex system – akin to the authors listed (Averin VI, Alipov NN, Belousov VV) possessing specialized knowledge.

Observe who holds influence – those involved in dissertation councils, attestation committees, or leading research centers. These individuals often control access to opportunities and resources. Just as understanding “additional” versus “extra” nuances clarifies meaning, understanding faculty roles clarifies pathways.

Seek out mentors who align with your goals. Don’t limit yourself to professors directly teaching your courses. Explore interdisciplinary connections, mirroring the diverse fields represented in the referenced materials (medicine, international relations). Building relationships with key faculty can unlock invaluable guidance and support throughout your Academy journey.

Survival Strategies: Academic

Thrive academically by employing effective study techniques, utilizing Academy resources (libraries, labs), seeking mentorship, and mastering exam preparation – essential for success!

Effective Study Techniques

Mastering the curriculum requires more than just attendance; it demands strategic study habits. Begin with active recall – don’t passively reread notes, but actively retrieve information from memory. Spaced repetition is crucial; review material at increasing intervals to solidify understanding.

Consider the Pomodoro Technique: focused 25-minute study sessions followed by short breaks. This combats mental fatigue and boosts concentration. Furthermore, elaborate interrogation – asking yourself “why” questions – deepens comprehension.

Don’t underestimate the power of Feynman Technique: explain concepts simply, as if teaching someone else. Identify gaps in your knowledge and revisit those areas. Finally, create a dedicated study space, free from distractions, to maximize efficiency. Remember, consistent effort, not just intense bursts, yields lasting results within the Academy’s challenging environment.

Utilizing Academy Resources (Libraries, Labs)

The Academy isn’t a solitary endeavor. Leverage its extensive resources! The library, beyond books (referenced in documents spanning from 2001 to 2024), offers digital databases, research assistance, and quiet study zones. Familiarize yourself with the cataloging system – efficient searching saves valuable time.

Labs provide hands-on experience crucial for many disciplines. Don’t hesitate to ask lab technicians for guidance; they are invaluable resources. Explore specialized software and equipment available – these tools can significantly enhance your projects.

Attend workshops offered by the Academy; these often cover resource utilization and advanced techniques. Remember, these resources are funded by your tuition; actively using them demonstrates a commitment to your education and maximizes your investment. Treat these spaces with respect and adhere to all guidelines.

Seeking Help: Tutoring & Mentorship

Don’t struggle in silence! The Academy provides robust support systems. Tutoring services, often peer-led or facilitated by advanced students, offer targeted assistance with challenging coursework. Explore both individual and group tutoring options to find what suits your learning style.

Mentorship programs connect you with faculty or experienced alumni who can provide guidance on academic and career paths. These relationships offer invaluable insights and networking opportunities. Proactively seek out mentors whose expertise aligns with your goals.

Remember, asking for help isn’t a sign of weakness, but of strength and self-awareness. Utilize office hours – faculty are there to support your learning. Resources, like those detailed in academic guides (dating back to 2001), emphasize proactive engagement with available support.

Exam Preparation & Test-Taking Skills

Mastering exams requires strategy, not just studying. Begin preparation well in advance, utilizing past papers and practice questions – a common theme across academic survival guides (referenced as early as 2001). Break down large topics into manageable chunks and employ active recall techniques like flashcards or teaching the material to others.

During the exam, carefully read each question and allocate your time wisely. Prioritize questions you’re confident in, then return to more challenging ones. Manage test anxiety through deep breathing exercises and positive self-talk. Remember, even “extra” effort can yield significant results.

Leverage Academy resources like study groups and workshops focused on test-taking strategies. Understanding the exam format and grading criteria is crucial. Don’t hesitate to seek clarification from professors during office hours.

Survival Strategies: Social

Navigate social landscapes carefully. Building alliances and friendships is key, but be mindful of academy politics and negative influences – a crucial aspect of long-term success.

Building Alliances & Friendships

Strategic Connections are Vital: The Academy, much like life, thrives on relationships. Don’t underestimate the power of genuine connections. Seek out individuals who complement your strengths and offer support in areas where you struggle. Remember the diverse range of students – mirroring the variety found across 71 novels, from Chapter 9 to 395!

Beyond Superficiality: While initial impressions matter, prioritize building friendships based on shared values and mutual respect. Avoid cliques driven by negativity or exclusionary practices. A strong network provides not only emotional support but also access to valuable information and resources. Consider this a parallel to the “Extra Landscaping Tools” mod – enhancing your environment.

Reciprocity is Key: Alliances aren’t one-sided. Be willing to offer assistance and support to your friends. A collaborative spirit fosters trust and strengthens bonds. Remember, even seemingly small acts of kindness can yield significant returns in the long run. This approach aligns with the principles of equality and identity, as highlighted in academic research.

Avoiding Conflict & Negative Influences

Navigating Troubled Waters: The Academy, like any complex system, harbors potential for conflict. Proactive avoidance is often the best strategy. Recognize individuals who consistently exhibit negativity or engage in disruptive behavior – mirroring problematic elements found even within extensive narratives (spanning Chapters 9 to 395 of various novels!).

Strategic Disengagement: Don’t feel compelled to engage in arguments or debates that serve no constructive purpose. Politely excuse yourself from tense situations. Remember, preserving your energy and focus is paramount. This echoes the resource management principles crucial for success, similar to optimizing settings in “Extra Landscaping Tools” for efficiency.

Protecting Your Well-being: Surround yourself with positive influences. Seek out mentors and peers who inspire and uplift you. Be wary of individuals who attempt to undermine your confidence or sabotage your efforts. Prioritize your mental and emotional health – a core tenet of long-term survival, as emphasized in dedicated survival guides.

Understanding Academy Politics

The Hidden Landscape: Beyond formal rules, the Academy operates with an intricate web of unspoken power dynamics. Recognizing these subtle currents is vital for navigating its complexities. Just as modding tools like “Extra Landscaping Tools” reveal hidden layers in a virtual world, understanding Academy politics unveils a deeper reality.

Observational Learning: Pay close attention to interactions between faculty and students, and among students themselves. Identify key players and their allegiances. Observe how decisions are made and who wields influence. This is akin to decoding a hidden curriculum, requiring careful observation and analysis.

Strategic Positioning: While avoiding direct involvement in conflicts (see previous section), be mindful of your own positioning. Align yourself with individuals and groups who share your values and goals. Remember, even within extensive narratives (spanning chapters 9-395!), alliances are crucial for survival and advancement.

Maintaining Personal Well-being

Prioritizing Self-Care: The Academy’s demands can be overwhelming. Remember that academic success isn’t solely about relentless effort; it requires a foundation of personal well-being. Just as optimizing graphics settings (“Extra” quality) requires balanced system resources, your energy needs careful management.

Establishing Boundaries: Learn to say “no” to commitments that overextend you. Protect your time for rest, relaxation, and activities you enjoy. This isn’t selfish; it’s essential for preventing burnout and maintaining focus. Think of it as resource management – time and energy are finite.

Seeking Support: Don’t hesitate to reach out to friends, family, or Academy resources (tutoring, mentorship) when you’re struggling. Remember, even extensive works (like those spanning chapters 9 to 395) benefit from collaboration and assistance. Prioritize your mental and physical health above all else.

Advanced Tactics: Beyond Basics

Mastering the Unseen: Success demands decoding the hidden curriculum, exploiting opportunities, and avoiding traps – akin to optimizing “Extra Landscaping Tools” for maximum impact.

Decoding Hidden Curriculum

Beyond the Syllabus: The Academy operates on layers. While official documents outline expectations, a significant portion of success hinges on understanding the unspoken rules – the “hidden curriculum.” This isn’t explicitly taught, demanding keen observation and astute deduction. Think of it as optimizing settings beyond “Medium” to “Extra,” gaining a competitive edge.

This involves recognizing subtle cues from faculty, understanding the power dynamics between departments (akin to academy politics), and identifying what truly drives advancement. It’s about interpreting not just what is said, but how and why. Consider the diverse range of academic materials – from novel chapters 9 to 395 – each offering unique perspectives.

Successfully navigating this requires active listening, networking with upperclassmen, and a willingness to learn from both successes and failures. It’s a continuous process of adaptation, much like mastering a complex mod like “Extra Landscaping Tools,” requiring constant refinement and understanding of underlying systems.

Exploiting Opportunities for Advancement

Seizing the Initiative: The Academy, like any complex system, presents numerous avenues for advancement beyond standard academic performance. Recognizing and capitalizing on these requires proactive engagement and a strategic mindset. Think of it as moving beyond “additional” effort to truly “extra” contributions.

This includes seeking out research opportunities with key faculty – those professors identified as influential – participating in extracurricular activities that demonstrate leadership, and actively networking within the Academy’s social circles. Just as a mod like “Extra Landscaping Tools” expands possibilities, so too can you expand your horizons.

Don’t passively wait for opportunities; create them. Propose innovative projects, volunteer for challenging assignments, and consistently strive to exceed expectations. Remember, success isn’t solely about innate talent, but about skillfully leveraging available resources and demonstrating initiative, mirroring the pursuit of higher academic degrees.

Recognizing and Avoiding Traps

Navigating Hidden Pitfalls: The Academy, while offering advancement, also harbors subtle traps designed to hinder progress. These aren’t necessarily malicious, but stem from complex social dynamics and unspoken rules. Awareness is your primary defense, much like understanding the nuances between “additional” and “extra” in language.

Be wary of alliances built on shaky foundations or promises of quick gains. Cliques, while offering social comfort, can also limit exposure to diverse perspectives and opportunities; Avoid becoming entangled in Academy politics – focus on your goals, not on internal conflicts. Remember the range of chapter numbers (9-395) – some paths are longer, but safer.

Prioritize personal well-being; burnout is a common trap. Recognize when to seek help, whether academic tutoring or mentorship. Don’t fall for distractions that offer short-term gratification at the expense of long-term objectives. Vigilance and self-awareness are crucial for navigating these challenges.

Long-Term Planning & Goal Setting

Charting Your Course: Success within the Academy demands foresight. Don’t merely react to immediate challenges; proactively define your long-term objectives. Consider your strengths, weaknesses, and desired outcomes – much like selecting the correct size (L or XL) for optimal fit.

Break down ambitious goals into manageable steps, mirroring the progression through novel chapters (from 9 to 395). Regularly assess your progress and adjust your strategy as needed. Explore opportunities for advancement, but evaluate them critically – are they aligned with your overall vision?

Remember that “extra” effort can yield significant rewards, but avoid overextension. Prioritize resource management – time and energy are finite. Cultivate a network of mentors and allies who can provide guidance and support. A well-defined plan, coupled with adaptability, is your strongest asset.